Page 10 of 15
Re: comenzando desde cero (Starting from scratch)
Posted: May 1st, 2020, 7:31 pm
by asesorplaza1
Os aclara varias cosas del dibujo de Frizting.
Los dos grupos de baterías que he puesto, son la representación de los distintos Voltajes que tengo en la placa de prototipos que salen de una sola fuente de PC, 12 V para alimentar los motores, 5V para alimentar los sensores, y me falta dibujar uno, el de 3.5 para alimentar el mando de la PS2.
El Arduino Maestro es el que está a la derecha de la foto, solo tiene conectado el mando de la PS2, un montón de LED como los tenía el proyecto de TechMonkey, los cables de transmisión de datos en los pines 18 TX1 y 19 RX1, y dos cables de GND, uno que va al otro Arduino, y otro que va a la placa de prototipos.
En el maestro me falta dibujar la resistencia de 10K que me dijiste que pusiera en el cable amarillo que es el de ATTENTION, pin 10.
En el Arduino Esclavo, hay muchísimo más lío, porque en el están conectados todos los sensores.
Los cables de transmisión de datos en los pines 18 TX1 y 19 RX1 cruzados con los del Arduino Maestro
TX1 Maestro a RX1 Esclavo
RX Maestro a TX1 Esclavo
Dos cables de GND, uno que va al otro Arduino, y otro que va a la placa de prototipos.
El componente que hay arriba a la izquierda, representa al relé que enciende y apaga los focos, no he encontrado nada más parecido a un relé
En los motores, me falta conectarles la entrada de corriente a 12V, pero no he descubierto como ponerlo.
Los dos interruptores que están conectados al Arduino Esclavo, representan al sensor de presión SKU237545, y al sensor de temperatura DS18B20, no he encontrado nada más parecido a los sensores de verdad.
Como podéis ver, el sensor de infrarrojos no es el del dibujo, sino el E18D80NK.
Los sensores DHT22 que estoy utilizando, llevan el controlador integrado, en vez del sensor solo como esta en el dibujo.
Por lo tanto hay que ponerle mucha imaginación al dibujo de Frizting, para que se parezca a las conexiones que tengo realmente.
Un saludo.
It clarifies several things from Frizting's drawing.
The two groups of batteries that I have put, are the representation of the different Voltages that I have on the prototype board that come out of a single PC source, 12 V to power the motors, 5V to power the sensors, and I need to draw one, the 3.5 to power the PS2 controller.
The Arduino Maestro is the one to the right of the photo, it only has the PS2 knob connected, a lot of LEDs as the TechMonkey project had them, the data transmission cables on pins 18 TX1 and 19 RX1, and two GND cables, one that goes to the other Arduino, and another that goes to the prototype board.
In the master I need to draw the resistance of 10K that you told me to put on the yellow cable that is that of ATTENTION, pin 10.
In the Arduino Slave, there is much more mess, because in it are connected all the sensors.
Data transmission cables on pins 18 TX1 and 19 RX1 crossed with those of the Arduino Maestro
TX1 Master to RX1 Slave
RX Master to TX1 Slave
Two GND cables, one going to the other Arduino, and one going to the prototype board.
The component at the top left, represents the relay that turns the spotlights on and off, I haven't found anything more like a relay
In the motors, I need to connect the current input to 12V, but I haven't figured out how to put it.
The two switches that are connected to the Slave Arduino, represent the pressure sensor SKU237545, and the temperature sensor DS18B20, I have not found anything more like the real sensors.
As you can see, the infrared sensor is not the one in the drawing, but the E18D80NK.
The DHT22 sensors I'm using carry the integrated controller, instead of the sensor just like this in the drawing.
So you have to put a lot of imagination into Frizting's drawing, so that it looks like the connections I really have.
Greetings.
Re: comenzando desde cero (Starting from scratch)
Posted: May 2nd, 2020, 3:36 am
by bigbadbob
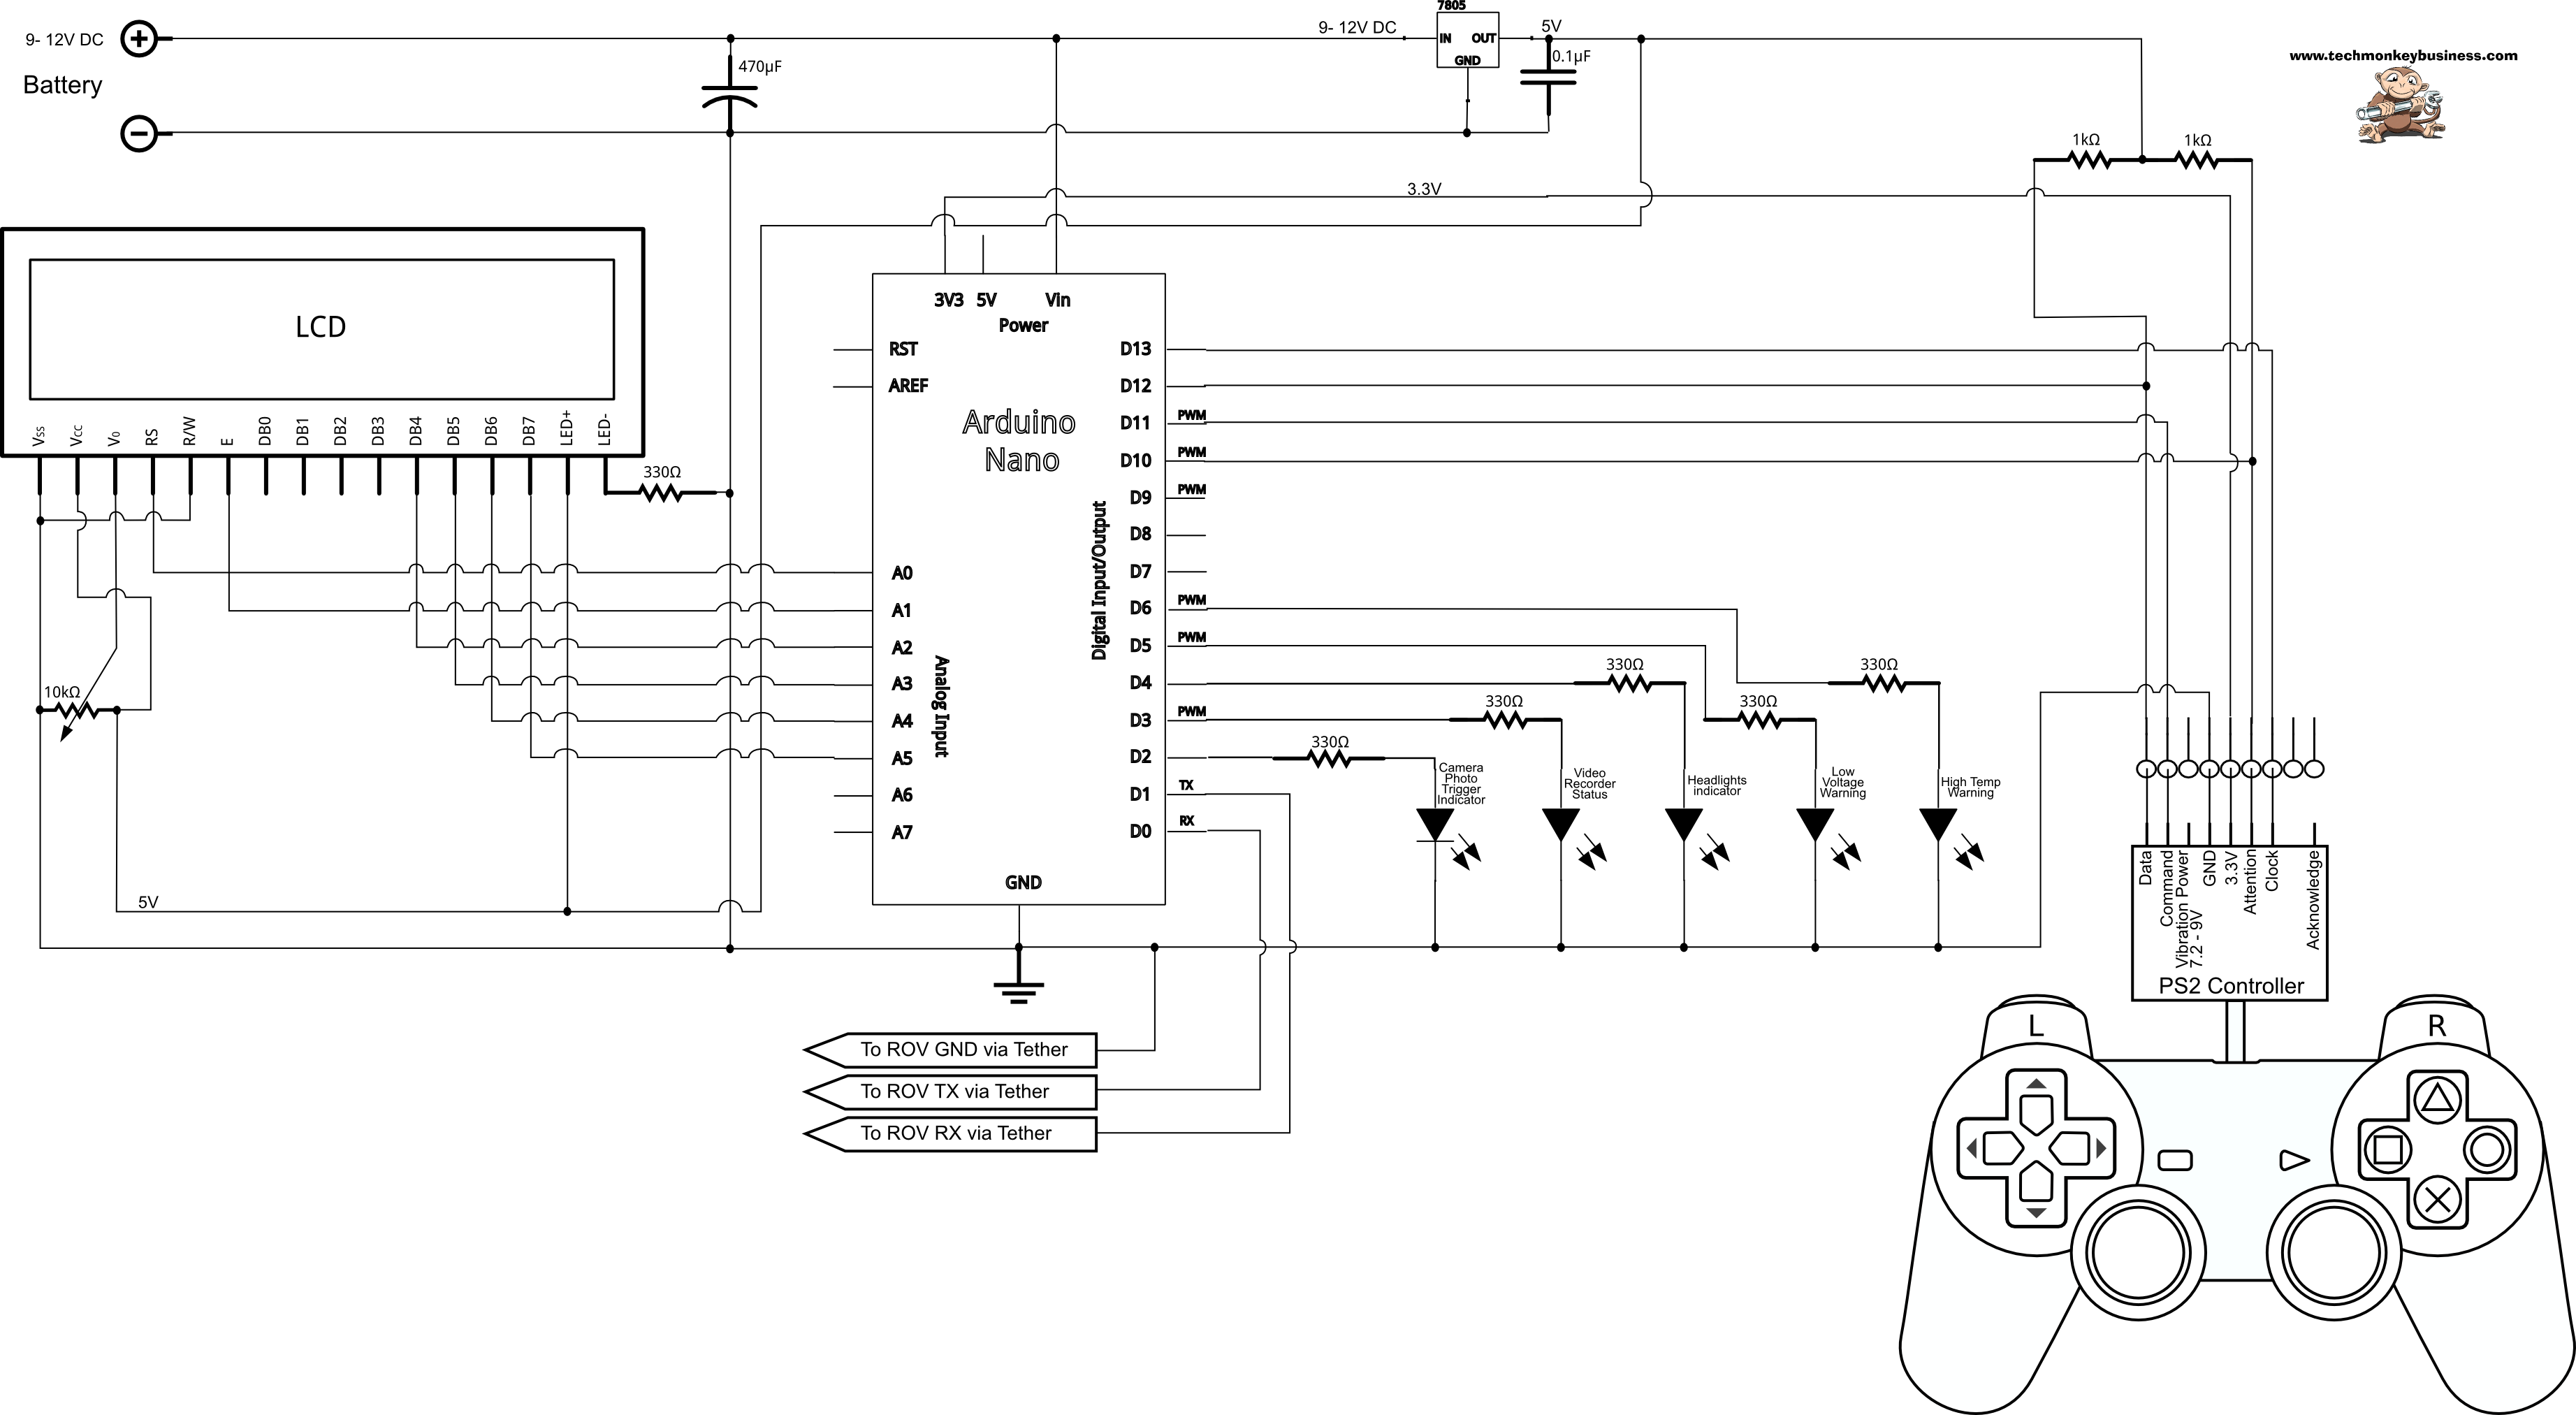
AAAAAGGGHHHHHH!!!!! Fritzing.... I hate Fritzing.
I am an electronics engineer, used to reading very complicated schematics but Fritzing.... acht.. I spit on Fritzing.

here is a schematic-
http://www.techmonkeybusiness.com/image ... _schem.png
I like schematics.

please send me a schematic of your circuit.

or put everything in a box and send it to me.
It is almost impossible to troubleshoot a hardware problem over the internet.
Re: comenzando desde cero (Starting from scratch)
Posted: May 2nd, 2020, 5:51 am
by asesorplaza1
Buenos días.
Que alegría, por fin un mensaje de Monitor Serie del Maestro como queríamos.
"Controlador encontrado y configurado con éxito".
"Prueba todos los botones, vibrara el mando mas rápido a medida que presiones mas fuerte".
"Mantener L1 o R1 imprimirá los valores del palo analógico".
"Ir a
www.billporter.info para actualizaciones y para informar de errores".
"Iniciando Sistema".
"Mando PS2 preparado".
Pero hasta aquí dura la alegría, se para el programa y no puedo ver la lista de sensores y sus datos.
En cuanto al esquema, lamento decirle que no se como hacerlo, por lo tanto, dígame su dirección completa, y le mandare un paquete con todo lo que tengo encima de la mesa.
Un saludo.
Good morning.
What a joy, finally a Master Series Monitor message as we wanted.
"Controller successfully found and configured".
"Try all the buttons, it will vibrate the controller faster as you press harder".
"Keep L1 or R1 will print the analog stick values".
"Go to
www.billporter.info for updates and to report bugs".
"Starting System".
"PS2 Command Ready".
But so far the joy lasts, it stops the program and I can not see the list of sensors and their data.
As for the scheme, I'm sorry to tell you that I don't know how to do it, so tell me your full address, and I'll send you a package with everything I have on the table.
Greetings.
Re: comenzando desde cero (Starting from scratch)
Posted: May 2nd, 2020, 12:53 pm
by asesorplaza1
Buenas tardes.
Voy a subir los códigos con los últimos cambios que me dijiste que hiciera. Ahora el Arduino Maestro, parece que reconoce el mando, pero no soy capaz de que envié ninguna orden al Arduino Esclavo.
Un saludo.
Good afternoon.
I'm going to upload the codes with the latest changes you told me to make. Now the Arduino Maestro, it seems that he recognizes the command, but I am not able to send any order to the Arduino Slave.
A greeting
Re: comenzando desde cero (Starting from scratch)
Posted: May 2nd, 2020, 5:09 pm
by asesorplaza1
Buenos días.
Por uno de aquellos misterios de la electrónica, sin tocar nada en ninguno de los dos programas, en el Monitor Serie del Arduino Maestro, después del reconocimiento del mando, sin saber el ¿por qué?, puedo ver la lista de los sensores con sus cambio en los datos, alguien ha estado rezando por mi, y no me lo ha dicho.
No se cuanto durará así, espero que mucho, pero el puñetero mando, sigue sin hacer nada, se enciende la luz que hay en el botón ANALOG, o se apaga cuando aprieto el botón, pero no envía ordenes al Arduino Esclavo.
La verdad, es que llevo todo el día buscando posibles soluciones en Internet, con los dos Arduinos completamente desconectados, a lo mejor eso les ha sentado bien.
Pero ya no se que hacer con el mando, como siga así, mañana saldrá despedido por la ventana.
No veo en ninguna pagina, ninguna referencia a que los pines del mando, puedan tener una configuración diferente, en el Arduino Mega 2560, o en el Arduino UNO.
Esto es desesperante.
Un saludo.
Good morning.
For one of those mysteries of electronics, without touching anything in either program, in the Arduino Maestro Series Monitor, after the recognition of the controller, without knowing the why, I can see the list of sensors with their changes in data, someone has been praying for me, and he has not told me.
I don't know how long it will last like this, I hope a lot, but the fucking controller, still does nothing, turns on the light on the ANALOG button, or turns off when I press the button, but does not send orders to the Slave Arduino.
The truth is, I've been looking for possible solutions on the Internet all day, with the two Arduinos completely disconnected, maybe that's been good for them.
But I don't know what to do with the command anymore, as it goes on like this, tomorrow he'll be fired out the window.
I don't see on any page, no reference to the controller pins, can have a different configuration, on the Arduino Mega 2560, or on the Arduino UNO.
This is nerve-wracking.
Greetings.
Re: comenzando desde cero (Starting from scratch)
Posted: May 2nd, 2020, 6:19 pm
by asesorplaza1
Buenas noches.
Como dicen los sabios, la esperanza es lo último que se pierde.
Como ya os he comentado, llevo todo el día buscando en Internet, alguna pagina que haga referencia a como conectar el Mando de la PS2 a un Arduino Mega 2560, y mire usted por dónde, ahora que ya lo iba a dejar por imposible, me encuentro nada más y nada menos que dos páginas que hacen referencia a esto, en una se utiliza un conversor lógico de nivel de 3.3V a 5V
https://www.luisllamas.es/controla-ardu ... de-la-ps2/
Y otra página donde se hace referencia expresa a como conectar un mando de PS2 a un Arduino Mega 2560, y como sospechaba, se utilizan otros pines para el funcionamiento del mando
https://github.com/Lynxmotion/Arduino-PS2X
Por lo tanto mientras me llega el conversor lógico de nivel, voy a probar a cambiar los pines que controlan el mando de mi código, y voy a desplazar los LED a los pines con los números después del 30, a ver qué pasa.
Cruzar los dedos, porque si funciona, es la única manera de que mañana, no salga el mando despedido por la ventana.
Un saludo.
Good night.
As the sages say, hope is the last thing that is lost.
As I have already told you, I have been searching the Internet all day, some page that refers to how to connect the PS2 Command to an Arduino Mega 2560, and look at you where, now that I was going to leave it impossible, I find myself nothing more and no less than two pages that refer to this, in one you use a logic converter level from 3.3V to 5V
https://www.luisllamas.es/controla-ardu ... de-la-ps2/
And another page where it is expressly referred to how to connect a PS2 controller to an Arduino Mega 2560, and as I suspected, other pins are used for the operation of the controller
https://github.com/Lynxmotion/Arduino-PS2X
So while I get the logical level converter, I'm going to try changing the pins that control my code, and I'm going to move the LEDs to the pins with the numbers after the 30, let's see what happens.
Crossing your fingers, because if it works, it's the only way tomorrow, the fired controller won't come out the window.
Greetings.
Re: comenzando desde cero (Starting from scratch)
Posted: May 3rd, 2020, 11:45 am
by bigbadbob
Hi.
Good to hear things are looking better.
I have looked at your last code and it all looks good.
in slave-
void loop ()
{
while (!ETin.receiveData()) // Recibe los datos al puerto serie para el ROV
{
return;
}
this means that the slave will do nothing if it doesn't receive data.
you are seeing the sensor data on the master so the slave must be receiving data from the master or it would not send sensor data to it.
for debug you can add-
Serial.println(" \n Datos recibidos del maestro.."); to slave line 353.
So if you get your controller working then all should be well.
As I said before, with my controller I cannot change mode by pressing the mode button, the led stays on because the ps2x library tells it to be in ANALOG mode.
the fact that you can change it is a symptom of the problem.
are you still using breadboard? it is very easy to have bad connections with breadboard. I would solder as many wires as you can and throw the breadboard out of the window.

if you throw everything out of the window I will try and catch it.
but I think you are on the right track. good luck.
Re: comenzando desde cero (Starting from scratch)
Posted: May 4th, 2020, 10:40 am
by medemt
bigbadbob wrote:AAAAAGGGHHHHHH!!!!! Fritzing.... I hate Fritzing.
I am an electronics engineer, used to reading very complicated schematics but Fritzing.... acht.. I spit on Fritzing.
here is a schematic-
http://www.techmonkeybusiness.com/image ... _schem.png
I like schematics.
please send me a schematic of your circuit.
or put everything in a box and send it to me.
It is almost impossible to troubleshoot a hardware problem over the internet.
Bigbadbob,
I'm with you. I almost bought the Fritzig the other day, but decided against it for a number of reasons. Give me a schematic any day of the week.
Other that my AutoCAD, is there a software that may be free that you can easily do electrical drawings with?
BTW, thanks for mentioning Tech Monkey. I had not learned about that one until today. Good info to read and learn from. As a noob, it is good to look at websites like this to gain info and to see what others are doing.
Thanks,
Dan
Re: comenzando desde cero (Starting from scratch)
Posted: May 4th, 2020, 3:02 pm
by asesorplaza1
Buenos días.
Para Medemt
Mucho cuidado con techMonkey, si no haces el proyecto exactamente como él, no funciona nada
Para Bigbadbob
Acabo de hacer el cambio que me has dicho, en la línea 353 del Esclavo.
Sigo usando la placa de prototipos, porque no tengo claro aun donde tiene que ir cada uno de los componentes, para que no me dé fallos.
En cuanto tenga seguro donde tiene que ir cada componente, los soldaré a una placa.
Ya tuve que cambiar de pines el giroscopio, ahora he tenido que cambiar de pines el mando, y no descarto, tener que cambiar alguna cosa más de los pines donde está conectado ahora, para que funcione correctamente.
He probado el programa de Github, donde se cambian los pines del mando, y el mando funciona perfectamente, por lo tanto al mando no le pasa nada.
El problema está en el programa del ROV.
Me he pasado todo el domingo, comparando el programa de Github, con el mío, y he conseguido ver el cambio de estado del botón de los focos en el Monitor Serie del Esclavo, pero le cuesta muchísimo tiempo hacer ese cambio, más de un minuto con el botón pulsado.
Pero no consigo encender los focos físicamente, el relé no salta de encendido a apagado, en ese momento.
Después de un rato de haber soltado el mando, es cuando salta el relé, y me asusta, porque yo espero que el relé salte cuando yo estoy presionando le botón, no cuando a él le parezca
Pero por lo menos empieza a funcionar.
Algo es algo.
A demás el encendido del montaje, tiene su proceso, no es encenderlo todo y ya está, tiene su orden para que todo funcione, si no, no funciona bien nada.
Tengo que cargar el programa en el Arduino Maestro, con todo lo demás desconectado de la corriente, después tengo que desconectar el Maestro del USB, y conectar el Arduino Esclavo al USB, cargarle el programa, y desconectarlo del USB, encender la fuente de alimentación del PC, con el Arduino Esclavo conectado, para que se encienda el Esclavo y todos los sensores, incluido el mando, después, conectar el Arduino Maestro al USB, y por ultimo conectar los cables de transmisión TX y RX.
Si no lo hago en ese orden, me da todo tipo de fallos, tanto del mando como del programa.
Tiene más protocolo que una visita oficial a la Reina de Inglaterra.
Un saludo.
Good morning.
For Medemt
Be very careful with techMonkey, if you don't do the project exactly like him, nothing works
For Bigbadbob
I just made the change you told me, on the Slave line 353.
I still use the prototype board, because I'm not sure even where each of the components has to go, so that I don't get faults.
As soon as I have insurance where each component has to go, I'll weld them to a board.
I already had to change pins the gyroscope, now I have had to change pins the knob, and I do not set out, having to change something else of the pins where it is connected now, so that it works properly.
I tried the Github program, where the pins of the controller are changed, and the controller works perfectly, so the controller does not pass anything.
The problem is in the ROV program.
I've spent all Sunday, comparing the Github program, with mine, and I've managed to see the shift in the state of the spotlight button on the Slave Series Monitor, but it takes a lot of time to make that change, more than a minute with the button pressed.
But I can't turn on the spotlights physically, the relay doesn't jump from on to off, at that time.
After a while of having released the controller, that's when the relay jumps, and it scares me, because I expect the relay to jump when I'm pressing the button, not when it seems to him
But at least it's starting to work.
Something's something.
Otherwise the ignition of the assembly, has its process, is not to turn everything on and that is, it has its order so that everything works, otherwise nothing works well.
I have to load the program into the Arduino Maestro, with everything else disconnected from the current, then I have to disconnect the Master from the USB, and connect the Arduino Slave to the USB, charge the program, and disconnect it from the USB, turn on the power supply of the PC, with the Arduino Slave connected, so that the Slave and all sensors are turned on , including the controller, then connect the Arduino Maestro to the USB, and finally connect the TX and RX transmission cables.
If I don't do it in that order, it gives me all kinds of glitches, both from the controller and the program.
He has more protocol than an official visit to the Queen of England.
Greetings.
Re: comenzando desde cero (Starting from scratch)
Posted: May 4th, 2020, 6:52 pm
by bigbadbob
Hi Dan. techmonkey's code is great, I've used bits of it for my ROV.
if you are "old school" like me you just scribble the diagram on the back of a cigarette packet or beer mat.
I do that at work and scan it to our drawings dept.
Hi AP1.
That's good that you are getting somewhere with it and haven't thrown it out of the window.
Try pressing the headlights button once and waiting for a while to see if they come on eventually.
I can't see what's slowing it down but if the code takes too long to execute then the ps2 controller won't get polled often enough to keep alive.
Easytransfer has a 255 byte limit on passing data, maybe you have too many things going on at once or need to use longer delays to give it time to pass the data.
Do you drive the headlight relay directly from the arduino or do you have a transistor taking care of that?
Do you have an oscilloscope you can check the power supply voltage ripple with?
a noisy power supply will cause no end of problems.
and as I said way back, connect your massas to one central point, don't chain them from one component to the next to the next etc.