ahora queda lo mas difícil, soldar cada cable y cada componente en su sitio, pero quien dijo miedo
now it is the hardest thing, to weld each cable and each component in its place, but who said fear
comenzando desde cero (Starting from scratch)
-
asesorplaza1
- Posts: 187
- Joined: Mar 4th, 2018, 6:11 pm
- Location: Valverde de Júcar, Cuenca, España
-
asesorplaza1
- Posts: 187
- Joined: Mar 4th, 2018, 6:11 pm
- Location: Valverde de Júcar, Cuenca, España
Re: comenzando desde cero (Starting from scratch)
otro de los problemas que he solucionado antes de soldar, es saber donde va situado cada cable, al final me he dado por vencido, la única manera de hacer funcionar el mando de la PS2, es siguiendo los pasos completos de la pagina
http://www.techmonkeybusiness.com/tag/rov.html
incluido el mando con cable, es la única manera de que funcione cada cosa como debe, que se enciendan los led, las luces los ESC, los motores en ambos sentidos, los servos, en fin FUNCIONA TODO como debe, y por supuesto tengo que olvidarme de el mando inalambrico y de cosas raras.
Another of the problems I've solved before soldering, is knowing where each cable is located, in the end I have given up, the only way to run the command of the PS2, is following complete steps of the page
http://www.techmonkeybusiness.com/tag/rov.html
Including the wired controller, it is the only way that every thing works as it should, that the LEDs are lit, the lights ESC, the motors in both directions, the servos, in order everything works as it should, and of course I have to forget the wireless control and strange Things.
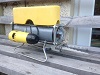
la caja cuadrada que se ve al lado del monitor LCD, es la punta del mando con cable de la PS2.
The square box that you see next to the LCD Monitor is the tip of the wired controller of the PS2.
ahora ya puedo soldar el cable de cada cosa en su sitio.
Now I can solder the cable of everything in its place.
http://www.techmonkeybusiness.com/tag/rov.html
incluido el mando con cable, es la única manera de que funcione cada cosa como debe, que se enciendan los led, las luces los ESC, los motores en ambos sentidos, los servos, en fin FUNCIONA TODO como debe, y por supuesto tengo que olvidarme de el mando inalambrico y de cosas raras.
Another of the problems I've solved before soldering, is knowing where each cable is located, in the end I have given up, the only way to run the command of the PS2, is following complete steps of the page
http://www.techmonkeybusiness.com/tag/rov.html
Including the wired controller, it is the only way that every thing works as it should, that the LEDs are lit, the lights ESC, the motors in both directions, the servos, in order everything works as it should, and of course I have to forget the wireless control and strange Things.
- en esta foto se pueden ver las conexiones entre los dos arduinos, el tablero PBC, unos motores de prueba, con sus ESC, y la fuente de un PC, que estoy usando cono fuente de alimentación, para no gastar tanta batería en las pruebas.
In this photo you can see the connections between the two Arduino, the PBC board, some test engines, with their ESC, and the source of a PC, I'm using cone power supply, not to spend as much battery in the tests - 20181204_223313.jpg (234.78 KiB) Viewed 13697 times
The square box that you see next to the LCD Monitor is the tip of the wired controller of the PS2.
ahora ya puedo soldar el cable de cada cosa en su sitio.
Now I can solder the cable of everything in its place.
-
asesorplaza1
- Posts: 187
- Joined: Mar 4th, 2018, 6:11 pm
- Location: Valverde de Júcar, Cuenca, España
Re: comenzando desde cero (Starting from scratch)
Bueno, pues como pasa casi siempre, se hace un gran descubrimiento por casualidad.
Como sabéis estoy siguiendo los pasos al pie de la letra de la pagina de ( http://www.techmonkeybusiness.com/rov-c ... ition.html ) aunque cambiando algunos sensores, y añadiendo otras cosas que creo que me hacen falta, y suprimiendo otras, que no creo necesarias, pero la base es la de la pagina.
He cambiado de mesa de trabajo, para lo cual he tenido que desconectar los dos Arduinos del ordenador y del tablero de la protoboard y de la fuente de alimentación, y al conectarlos, me he equivocado y he pinchado los dos Arduinos, el maestro y el esclavo a la fuente de alimentación, y para sorpresa mía, todo lo que antes no funcionaba, de repente ha empezado a funcionar, ya tengo la pantalla LCD con lecturas, hasta ahora solo se encendía sin decir nada, los led que iban locos, ahora me hacen caso cuando pulso los botones, el mando que iba cuando le daba la gana, ahora va a la perfección, el servo se mueve muy suave, según las ordenes del mando, antes iba dando saltos, los motores funcionan, según la ordenes del mando, antes iban a su aire, vamos que ahora va como tiene que funcionar.
Sabéis cual era el fallo, la puñetera corriente de entrada, como tenia el Maestro pinchado al ordenador por el puerto USB, solo le entraban 5v, al conectarlo a la fuente de alimentación, a 12v, y se le han quitado todos los males.
Había leído en muchas partes que el Arduino, tiene una corriente de trabajo de entre 5v, y 20v, y que preferiblemente se alimente a 9v, como estoy cambiando el sketch de continuo, tenia conectado el Maestro al ordenador, por lo tanto solo le entraban 5v, voltaje insuficiente para encender la pantalla LCD y los led, al conectarlo a 12v, tiene voltaje suficiente para mover todo lo que tiene conectado, que tampoco es tanto, pero suficiente para que el Arduino no pueda repartir voltaje a los elementos conectados.
Por lo tanto me toca de modificar el sketch, pinchar el Arduino al ordenador, compilar y subir, y después para poder probarlo, me toca desconectarlo del ordenador y conectarlo a la fuente de alimentación, para que se vea si realmente funciona o hay algún fallo.
Ahora solo falta que se comunique con migo en Español, en vez de en Ingles, eso ya seria la leche.
seguiré investigando y desarrollando, un saludo a todos.
s happens almost always, a great discovery is made by chance.
As you know I am following the steps at the bottom of the page of (http://www.techmonkeybusiness.com/rov-c ... ition.html) although changing some sensors, and adding other things that I think I need them, and suppressing others, that I do not think necessary, but the base is that of the page.
I have changed the work table, for which I had to disconnect the two Arduinos from the computer and from the board of the breadboard and the power supply, and when connecting them, I was wrong and I punctured the two Arduinos, the teacher and the slave to the power supply, and to my surprise, everything that did not work before, has suddenly started to work, I already have the LCD screen with readings, until now it only went on without saying anything, the led that went crazy, now they listen to me when I press the buttons, the control that went when it pleased, now goes to perfection, the servo moves very smooth, according to the orders of the command, before jumping, the engines work, according to the orders of the command, before they went their own way, let's go now how it has to work.
You know what was the fault, the damn input stream, as the Master had punctured to the computer by the USB port, only entered 5v, when connected to the power supply, to 12v, and all evils have been removed.
I had read in many parts that the Arduino, has a working current of between 5v, and 20v, and that preferably it is fed to 9v, as I am changing the sketch continuously, I had the Master connected to the computer, therefore I only entered it 5v, insufficient voltage to turn on the LCD and led, when connected to 12v, has enough voltage to move everything that is connected, which is not so much, but enough so that the Arduino can not distribute voltage to the connected elements.
Therefore I have to modify the sketch, click the Arduino to the computer, compile and upload, and then to try it, I have to disconnect it from the computer and connect it to the power supply, so that it is seen if it really works or there is a fault .
Now I just need to communicate with me in Spanish, instead of in English, that would be milk.
I will continue investigating and developing, greetings to all.
- Attachments
-
- que alegria
what joy - 20190320_195223.jpg (84.69 KiB) Viewed 13113 times
-
- esta vivo
its alive - 20190320_195212.jpg (87.88 KiB) Viewed 13113 times
-
asesorplaza1
- Posts: 187
- Joined: Mar 4th, 2018, 6:11 pm
- Location: Valverde de Júcar, Cuenca, España
Re: comenzando desde cero (Starting from scratch)
Hola a todos
He estado un tiempo sin escribir en este foro, porque he estado intentado progresar en mi proyecto poco a poco, y he conseguido algunos avances en el.
Pero me he vuelto a atascar, os explico que me pasa, porque el Arduino va su aire y no me hace caso, me explico:
como ya sabéis tengo todo el proyecto encima de la mesa, la alimentación la estoy haciendo con una fuente de PC, de la que saco los voltajes que necesito, 3.5 V, 5 V y 12 V, todas las masas conectadas entre sí, el Arduino Maestro lo alimento desde el puerto USB del ordenador, y el Esclavo está conectado al circuito de la fuente de alimentación del PC a 12 V, todos los sensores alimentados desde la fuente de PC a 5 V, las masas de los Arduino conectadas entre sí y al circuito de la fuente de PC, y a demás he comprobado el circuito, por si acaso.
Esas entradas de corriente a la placa de prototipos, entran desde una fuente de alimentación para protoboard YWRobot
Entonces porque cuando le doy corriente a todo la mayoría de las veces el esclavo no responde a las ordenes del mando de la PS2, hasta ahora me lo hacía de vez en cuando pero ahora lo hace con mayor frecuencia, y no entiendo el porqué, el colmo ha sido cuando he conectado un relé para que me encienda un foco LED de 12 V, y llega a tardarme entre 6 y 25 segundos en apagarse o encenderse con el botón de la PS2 pulsado.
Cuando hablamos que el Arduino se vuelve lento, estamos midiendo milisegundos, no segundos, incluso minutos
Los ESC, que tienen el polo positivo desconectado, para que no me manden corriente al circuito, ya que pueden alimentar al receptor si se conectan los motores a 12 V, pitan con el ciclo de arranque se quedan en reposo y cuando le doy al joystick tardan entre 15 o 20 segundos mínimo en poner el motor en marcha, y luego no hay quien los pare hasta que desconecto la corriente.
Por otro lado estoy haciendo magia, si desconecto la corriente de los dos Arduino, de la placa de prototipos, y la entrada de corriente de la fuente de alimentación, porque sigue funcionando el circuito, de donde coge la corriente para que se queden los sensores que tienen piloto de funcionamiento encendido, si no hay conectada ninguna salida de corriente de ninguno de los dos Arduino, y están todos los polos positivos desconectados
Solo hay un condensador de 10 uF, conectado al servo para evitar tirones de corriente cuando arranca y valla más suave, que es el único acumulador de corriente en todo el circuito, pero si lo desconecto sigue funcionando todo
Para colmo, la fuente de alimentación para protoboard YWRobot, tiene un interruptor que se supone corta la corriente al circuito, pues no corta la corriente
Según lo estoy contando no tiene lógica y eso que soy yo el que lo está escribiendo
No sé de donde sale el polo positivo que me está dando corriente y cierra el circuito, que no es un cable de corriente, ya que lo he comprobado 2 veces
Adjunto el código
Un saludo a todos
Hello everyone
I have been unwrought on this forum for a while, because I have been trying to progress on my project little by little, and I have made some progress in it.
But I have gotten stuck again, I explain that it happens to me, because the Arduino goes his air and ignores me, I explain:
as you know I have the whole project on the table, the power I am doing with a PC source, from which I take out the voltages I need, 3.5 V, 5 V and 12 V, all the masses connected to each other, the Arduino Master feed it from the USB port of the computer , and the Slave is connected to the PC's 12 V power supply circuit, all sensors fed from the PC source at 5 V, the masses of the Arduinos connected to each other and the PC source circuit, and to others I have checked the circuit Just in case.
Those current inputs to the prototype board come in from a YWRobot protoboard power supply
So because when I keep up to everything most of the time the slave doesn't respond to the command orders of the PS2, so far he did it to me from time to time but now he does it more often, and I don't understand why , the end of the way has been when I connected a relay to turn on a 12 V LED light, and it takes me 6 to 25 seconds to turn off or on with the PS2 button pressed.
When we talk that the Arduino becomes slow, we are measuring milliseconds, not seconds, even minutes
The ESCs, which have the positive pole disconnected, so that they do not send me current to the circuit, since they can feed the receiver if the motors are connected to 12 V, beep with the starting cycle stay at rest and when I give the joystick take between 15 or 20 seconds minimum minimum to start the engine, and then there's no one to stop them until I turn off the current.
On the other hand I am doing magic, if I disconnect the current of the two Arduino, from the prototype board, and the current input of the power supply, because the circuit continues to operate, from where it takes the current so that the sensors that have operating pilot on, if no current output is connected from either Arduino, and all positive poles are disconnected
There is only one 10 uF capacitor, connected to the servo to prevent current pulls when it starts and smoother fence, which is the only current accumulator in the entire circuit, but if I disconnect it it still works everything
To top it off, the YWRobot protoboard power supply has a switch that is supposed to cut the current to the circuit, as it does not cut the current
As I'm telling it, it doesn't make sense and that's me writing it.
I do not know where the positive pole that is giving me current comes from and closes the circuit, which is not a power cable, since I have checked it 2 times
I attach the code
Greetings to all
- Attachments
-
- ARCHIVO FRITZING.rar
- (42.7 KiB) Downloaded 3458 times
-
- 15_08_03_2020.rar
- (11.79 KiB) Downloaded 3719 times
Re: comenzando desde cero (Starting from scratch)
This sounds like a problem with your ground wiring. google has translated masas incorrectly but I know what you mean.
try connecting your "masas" together as close as possible to the power supply and do not connect them in a chain but like a star.
did you follow techmonkey's schematic exactly?
try connecting your "masas" together as close as possible to the power supply and do not connect them in a chain but like a star.
did you follow techmonkey's schematic exactly?
-
asesorplaza1
- Posts: 187
- Joined: Mar 4th, 2018, 6:11 pm
- Location: Valverde de Júcar, Cuenca, España
Re: comenzando desde cero (Starting from scratch)
Masas = cable negativo, GND, o tierra
He seguido el esquema de techmonkey, hasta donde he podido, ya que alguno de los sensores que utiliza no los he podido encontrar por obsoletos, los fabricantes ya no hacen ese modelo de sensor, y los he tenido que cambiar por otros sensores.
¿A qué te refieres con "conectarlos como una estrella", se supone que deben estar todas las pistas de contacto GND, conectadas entre sí, y así es como lo tengo.
Un saludo.
Masas = negative cable, GND, or ground
I have followed the techmonkey scheme, as far as I can, since some of the sensors I use have not been able to find them as obsolete, the manufacturers no longer make that sensor model, and I have had to change them to other sensors.
What do you mean, "connect them like a star", all GND contact tracks are supposed to be connected to each other, and that's how I have it.
Greetings.
-
asesorplaza1
- Posts: 187
- Joined: Mar 4th, 2018, 6:11 pm
- Location: Valverde de Júcar, Cuenca, España
Re: comenzando desde cero (Starting from scratch)
Me ha dado bastantes quebraderos de cabeza, y me los sigue dando, pero voy avanzando poco a poco, ya funciona toda la electrónica encima de la mesa, y ya he conseguido que se comuniquen los componentes principales, el Arduino de control, al que llamo “Maestro”, el Arduino que está dentro del vehículo al que llamo “Esclavo”, y el mando de la Play Station 2 (PS2), todo esto ya obedece a las ordenes del mando, y la Raspberry pi 3+, que me manda las imágenes en tiempo real al ordenador.
Todo esto con 4 motores sin escobillas, un giroscopio, 3 sensores de temperatura y humedad para controlar el interior del ROV, 2 sensores de presión, 1 sensor de temperatura exterior, 2 sensores de presión, uno interior y otro exterior, 2 focos de 12 Voltios, controlados por sus 2 relés, para poder encenderlos y apagarlos cuando proceda, su servo para la inclinación, que controla la inmersión y la subida a superficie, y un montón de indicadores LED de colores, para saber cuándo pulso los botones del mando de PS2.
Para no ser ningún experto en informática, es todo un logro haber conseguido que el proyecto funcione.
Aun me quedan por depurar algunas cosas de los programas, pero he conseguido avanzar muchísimo, en breve podre acomodar la electrónica dentro del casco y poder seguir con la construcción del vehículo.
Como ya os comente en su momento hasta que no termine con este proyecto no puedo empezar con el barco, y la verdad, ya tengo ganas de meterle mano, pero todo se andará, con tiempo y paciencia, todo se hace.
Espero que estéis todos bien de salud, y que llevéis el confinamiento de la mejor manera posible, entretenidos con los modelos de construcción de barcos, cada uno con su proyecto.
Un saludo a todos
It has given me enough headaches, and it keeps giving them to me, but I am slowly moving forward, all the electronics work on the table, and I have already managed to get the main components communicated, the Arduino of control, which I call "Master", the Arduino that is inside the vehicle I call "Slave", and the control of the Play Station 2 (PS2) , all this is already due to the commands of the controller, and the Raspberry pi 3+, which sends the images in real time to the computer.
All this with 4 brushless motors, a gyroscope, 3 temperature and humidity sensors to control the inside of the ROV, 2 pressure sensors, 1 outdoor temperature sensor, 2 pressure sensors, one inside and one outside, 2 12 Volt bulbs, controlled by its 2 relays, so you can turn them on and off when applicable, your servo for tilting , which controls immersion and surface rise, and lots of colored LED indicators, to know when I press the buttons on the PS2 controller.
To be no computer expert, it's quite an achievement to have made the project work.
I still have to clean up some things from the programs, but I have managed to go a long way, soon I will be able to accommodate the electronics inside the helmet and be able to continue with the construction of the vehicle.
Since I tell you at the time until I finish this project I can not start with the boat, and the truth, I already want to get in hand, but everything will walk, with time and patience, everything is done.
I hope you're all in good health, and that you take the confinement in the best possible way, entertained with the shipbuilding models, each with their own project.
Greetings to all
Re: comenzando desde cero (Starting from scratch)
That's great that you got it all working on the bench.
Time and patience is everything. I've been building mine for 9 years now.
Stay safe in these surreal times.
Time and patience is everything. I've been building mine for 9 years now.
Stay safe in these surreal times.
-
asesorplaza1
- Posts: 187
- Joined: Mar 4th, 2018, 6:11 pm
- Location: Valverde de Júcar, Cuenca, España
Re: comenzando desde cero (Starting from scratch)
Bueno, pues después de toda la tarde cambiando " if " por " else if ", y depurando un montón de fallos de compilación, he conseguido cambiar muchos de los " if ", por los " else if ", también he conseguido incorporar todos los botones del mando en los dos programas, y he incluido el sistema de refrigeración del casco y de los tubos de los motores, mediante un relé.
No he podido cambiar todos los "if " por " else if ", porque el error de compilación me decía que no puede haber un " else " delante de un " if ", aun así he cambiado muchos en los dos programas.
Adjunto los dos programas para ver si así os gustan más, (ya sé que no es cuestión de gustos, si no de eficiencia).
Tampoco he podido incluir las funciones del mando en el código " Esclavo ", en un bloque de trabajo como están el resto de los sensores, no sé por qué, pero no lo admite, por eso están dentro del void loop general.
Os ruego que le echéis un vistazo a los dos códigos, a ver si veis alguna otra cosa que se pueda mejorar
Un saludo
Well, after all afternoon changing "if" to "else if", and debugging a lot of compilation failures, I have managed to change many of the "if", to the "else if", I also managed to incorporate all the buttons of the controller into the two programs, and I have included the cooling system of the helmet and the tubes of the engines, by means of a relay.
I couldn't change all the "if" to "else if", because the compilation error told me that there can't be an "else" in front of an "if", I've still changed many in both programs.
I attach the two programs to see if you like them more, (I know it's not a matter of taste, if not efficiency).
Nor have I been able to include the functions of the controller in the code "Slave", in a working block as are the rest of the sensors, I do not know why, but does not support it, so they are inside the general void loop.
I beg you to take a look at the two codes, see if you see anything else that can be improved
A greeting
- Attachments
-
- 24_18_04_2020.rar
- (15.51 KiB) Downloaded 3644 times
Re: comenzando desde cero (Starting from scratch)
Hi asesorplaza1
Looking at your code-
This will always be true...
you might like to try-
You'll need to change all the buttons to be like this.
And then all of these need to be swapped around.
so it looks like this-
I think this will work better.
Bob.
Looking at your code-
Code: Select all
else if (ps2x.Button(R2state)) // Si presionamos el boton R2
  {
    txdata.R2state = (txdata.R2state); // enciende / apaga las luces
    digitalWrite(yelLEDpin, HIGH); // Enciende el Led Amarillo
}you might like to try-
Code: Select all
else if (ps2x.ButtonPressed(R2state)) // Si presionamos el boton R2
  {
    R2state = (!R2state); // enciende / apaga las luces (!=logical NOT)
    digitalWrite(yelLEDpin, HIGH); // Enciende el Led Amarillo
}; // enciende / apaga las lucesAnd then all of these need to be swapped around.
Code: Select all
PAD_UPstate = (txdata.PAD_UPstate);         // Manda lectura del botón Izquierda arriba al Esclavo ***
  PAD_DOWNstate = (txdata.PAD_DOWNstate);     // Manda lectura del botón Izquierda abajo al Esclavo  ***
  // int PSB_PAD_LEFT;                       // El botón Izquierda izquierdo ya esta usado para encender los focos  ***
  PAD_RIGHTstate = (txdata.PAD_RIGHTstate);   // Manda lectura del botón Izquierda derecho al Esclavo ***
  BLUEstate = (txdata.BLUEstate);             // Manda lectura del botón Cruz azul al Esclavo  ***
  GREENstate = (txdata.GREENstate);           // Manda lectura del botón Triangulo verde al Esclavo ***
  PINKstate = (txdata.PINKstate);             // Manda lectura del botón Cuadrado rosa al Esclavo  ***
  REDstate = (txdata.REDstate);               // Manda lectura del botón Circulo rojo al Esclavo ***
  L1state = (txdata.L1state);                 // Manda lectura del botón Izquierda delante arriba al Esclavo  ***
  L2state = (txdata.L2state);                 // Manda lectura del botón Izquierda delante abajo al Esclavo  ***
  L3state = (txdata.L3state);                 // Manda lectura del botón Palo izquierdo abajo al Esclavo ***
  R1state = (txdata.R1state);                 // Manda lectura del botón Derecha delanta arriba al Esclavo  ***
  R2state = (txdata.R2state);                 // Manda lectura del botón Derecha delante abajo al Esclavo  ***
  R3state = (txdata.R3state);                 // Manda lectura del botón Palo derecho abajo al Esclavo **
Code: Select all
txdata.PAD_UPstate = (PAD_UPstate);         // Manda lectura del botón Izquierda arriba al Esclavo ***
  txdata.PAD_DOWNstate = (PAD_DOWNstate);     // Manda lectura del botón Izquierda abajo al Esclavo  ***
  // int PSB_PAD_LEFT;                       // El botón Izquierda izquierdo ya esta usado para encender los focos  ***
  txdata.PAD_RIGHTstate = (PAD_RIGHTstate);   // Manda lectura del botón Izquierda derecho al Esclavo ***
  txdata.BLUEstate = (BLUEstate);             // Manda lectura del botón Cruz azul al Esclavo  ***
  txdata.GREENstate = (GREENstate);           // Manda lectura del botón Triangulo verde al Esclavo ***
  txdata.PINKstate = (PINKstate);             // Manda lectura del botón Cuadrado rosa al Esclavo  ***
  txdata.REDstate = (REDstate);               // Manda lectura del botón Circulo rojo al Esclavo ***
  txdata.L1state = (L1state);                 // Manda lectura del botón Izquierda delante arriba al Esclavo  ***
  txdata.L2state = (L2state);                 // Manda lectura del botón Izquierda delante abajo al Esclavo  ***
  txdata.L3state = (L3state);                 // Manda lectura del botón Palo izquierdo abajo al Esclavo ***
  txdata.R1state = (R1state);                 // Manda lectura del botón Derecha delanta arriba al Esclavo  ***
  txdata.R2state = (R2state);                 // Manda lectura del botón Derecha delante abajo al Esclavo  ***
  txdata.R3state = (R3state);                 // Manda lectura del botón Palo derecho abajo al Esclavo **
//and then you need to send the data so put
ETout.sendData();  // here.
Bob.