Page 2 of 10
Re: ROV progress
Posted: Sep 17th, 2012, 5:25 pm
by bikerbones1968
I decided to buy these ones from Hobby King. They are rated for 30 Amp and are Reversing Car ESC's for brushless motors.
Re: ROV progress
Posted: Sep 17th, 2012, 5:35 pm
by bikerbones1968
DavidF wrote:Somebody needs to come over here and slap me so I stop trying to find the hardest way of doing things. Nice looking thruster Bones, have you done any testing to see what they put out?? How about a video of them kicking up some waves??
It still kinda freaks me out though, running an electrical motor exposed underwater, I work in a water plant and it only takes a little bit of water to distroy our motors. But then agin they are a totally different beast.....
Thats the beautiful thing about these brushless motors and DC voltage. Water is not an issue. They are happy to run submerged without seals or in enclosures. Just wash them with fresh water, blow them dry with compressed air, apply a little moisture displacer and non conductive lubricant and your good to go.
Re: ROV progress
Posted: Sep 17th, 2012, 5:37 pm
by bikerbones1968
KR2_Diving wrote:Great looking build so far! Can't wait to see more!
Two questions on the thrusters:
How are you mounting your motors?
What size ESC did you end up using?
I think we already talked about the ESC, but I have been doing so much research in the last few days it has all be come a bit of a blur!
Can't wait to see more!
Ryan
"KR2_Diving"
I will post that as soon as I have finished building the mounts. I have a few ideas but nothing carved in stone yet.
Re: ROV progress
Posted: Sep 17th, 2012, 6:07 pm
by DavidF
I was just about to pull the motor out of my grand daughters power wheels but I might be reconsidering now lol
Re: ROV progress
Posted: Sep 17th, 2012, 11:10 pm
by bikerbones1968
DavidF wrote:I was just about to pull the motor out of my grand daughters power wheels but I might be reconsidering now lol
I am sure she will be pleased that you may have changed your mind on your motor source!!

Re: ROV progress
Posted: Sep 18th, 2012, 2:01 pm
by bikerbones1968
Ok I have been debateing on how best penetrate the Hull and maintain no leaks. Steves "Sealing Wire Exit Holes"
http://www.homebuiltrovs.com/howtosealingwireexits.html slightly adapted I feel will be just the ticket.
Re: ROV progress
Posted: Sep 18th, 2012, 2:26 pm
by DavidF
As long as the epoxy doesnt loose its seal to the pipe cap (shrinkage) it should work out. Maybe wax the inside of the pipe cap so you can pull the epoxy puck out machine an o ring grove on it and reinstall with a couple of bolts?? LOL thats me trying to find a more difficult way to do things... But I did find a 32 led flash light at HF for 6.00 that would be easy to modify for an rov
Re: ROV progress
Posted: Sep 18th, 2012, 2:38 pm
by bikerbones1968
The idea of using a threaded plug penetrating the Hull posed the possibility of leaks around the threads in my mind. I opted to do it slightly different. I cut a 2" PVC coupling in half and began to file, grind and sand down each of the halves. One to fit firmly on the exterior of the Hull and one on the interior. After I was happy with the fitment I roughed up the surfaces with 80 grit sand paper. Then I applied purple PVC primer and then grey PVC glue to both the Hull and "Potting Well". I used a cargo strap to apply downward force to the exterior "Potting Well".
Re: ROV progress
Posted: Sep 18th, 2012, 2:40 pm
by bikerbones1968
I used a homemade mini jackpost made from a galvanized 1 1/2 " water pipe coupling and a PVC threaded reducer to apply upward pressure to the Interior "Potting Well".
Re: ROV progress
Posted: Sep 18th, 2012, 2:47 pm
by bikerbones1968
The finished product.
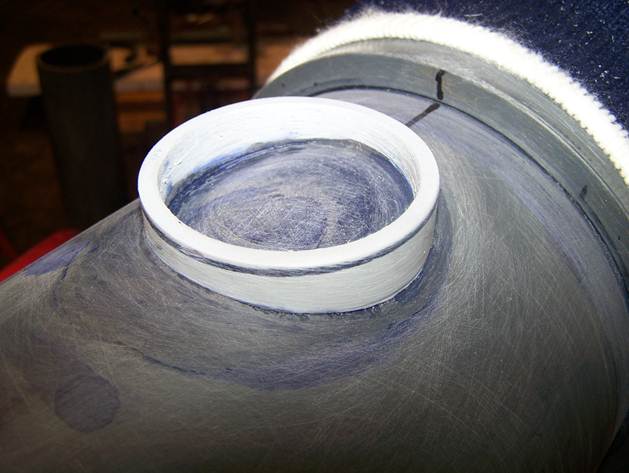
- Exterior PVC Potting Well.JPG (35.67 KiB) Viewed 10248 times