The original design was suppose to be something simple a beginner could build while at the same time I was trying to make a really small Rov because it's just something I wanted to do. My initial design had a major flaw where I couldn't get positive buoyancy using PVC chambers like I wanted to (without going to 3" pipe) so the project kept getting thrown on the back burner. Trying to get motivated again to get active with ROV's I recently started toying with the idea of using fiberglass covered blue insulation board for buoyancy. I knew it's not a great idea but I though it might be somewhat doable seeing as the Rov only has a 100' tether. After carving out a float out of foam it was pointed out in another thread that even at depths of around 65' that approach wouldn't really work (I'm just glad I saw that thread before starting the fiberglass part.) so now I'm going in a slightly different direction that may or may not work.
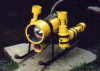
I am going to reuse the same simple thruster/control system I all ready built (which is highlight here.) and just design a new frame. The frame design will be very similar but this time it will be 3D printed because I want to test out that approach to see if it's a viable option for us DIY'ers.
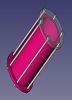
Below is the start of some initial designs ideas I am working on but will likely change along the building process.
- Design003.jpg (59.37 KiB) Viewed 259818 times
- Design004.jpg (55.08 KiB) Viewed 259818 times
- Design005.jpg (53.54 KiB) Viewed 259818 times
- Design003_2.jpg (69.52 KiB) Viewed 259818 times
- Design006.jpg (60.03 KiB) Viewed 259818 times
- Design001.jpg (70.72 KiB) Viewed 259818 times
- Design002.jpg (69.31 KiB) Viewed 259818 times
- Design002_2.jpg (73.51 KiB) Viewed 259818 times
-Steve