sounds like you came up with another solution, though!
No Name ROV
Re: No Name ROV
sorry to hear that. I ran into a similar issues with a threaded fitting that I cut down. the threads are slightly tapered and the result was I couldn't screw it into the mating section. 
sounds like you came up with another solution, though!
sounds like you came up with another solution, though!
-
timothyalderson
- Posts: 92
- Joined: Sep 24th, 2011, 6:34 pm
Re: No Name ROV
Do you have the Sketch Up Pro version or the free one?

Re: No Name ROV
timothyalderson asks, "Do you have the Sketch Up Pro version or the free one?"
I have only the free version.
It appears the main difference between the two is with Pro you are able to read and write files in a variety of common CAD formats. This is necessary for engineers and designers that are collaborating and sharing files with others whose offices use different CAD software.
Also, in terms of CAD tools available, Pro has a few functions for manipulating 3D solids interacting with each other that are not available in the free version.
Seems to me a no-brainer to start with the free version, then move up to Pro as and if the need arises. For me, the need has not yet arisen.
Re: No Name ROV
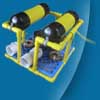
Near the bottom of page 4 martinw was wondering what bad effect the vertical props being so close to the main hull might have. derelicte suggested trying to shorten up the bushing assembly to create more space. That idea didn't work out so well. But after a long search I found a Canadian company, http://www.spears.com, that makes a 2" x 3/4" reducing coupling (part no. 429-248), which will make a much nicer transition from the motors to the frame. I was hoping it would also shorten up the motor assembly. It did, but only by about a 1/4".
This same part makes a nice "nose cone" for the upper buoyancy tubes, which are also now 2" diameter. The attached pics show the new motor assembly and the "nose cone" use of these couplings.
This same part makes a nice "nose cone" for the upper buoyancy tubes, which are also now 2" diameter. The attached pics show the new motor assembly and the "nose cone" use of these couplings.
- Attachments
-
- new thruster 005_adj.jpg (69.5 KiB) Viewed 3069 times
-
- ROV23_rev3_front.png (107.05 KiB) Viewed 3069 times
Re: No Name ROV
Very nice. when are you going to put all the bits together and try it out in the water?
Re: No Name ROV
ummm . . . probably as soon as you guys stop asking good questions and making good suggestions.
-
thegadgetguy
- Posts: 238
- Joined: Feb 13th, 2011, 8:27 pm
- Location: Pennsylvania
Re: No Name ROV
I sense that we could all be here for quite a while...
-
tristanplaysguitar
- Posts: 10
- Joined: Feb 22nd, 2011, 3:37 pm
- Contact:
Re: lights' mounts
Hey, i was wondering how you mounted your lights and what materials you used for it. Links are greatly appreciated, thanks.
Tristan
Tristan
Re: No Name ROV
Hi Tristan ~ 'Sorry I am slow responding ... The lights themselves are Tovatec Mini Torch Flashlights, available at http://www.amazon.com/Intova-IMINI-Tova ... 132&sr=8-4
Specifications:
LED light: One 220-lumen CREE
LED lifetime: 100,000 hours
Depth rating: 400 feet (122 meters)
Beam angle: 53 degrees
Power: Two CR 123 (included)
Variable power: Yes -- full, 30 percent, and strobe
Switch: Magnetic/tail
Burn time: Up to 10 hours (at full power)
Dimensions: 4.9 inches long, 1.4-inch diameter
Weight: 6.5 ounces (with batteries)
They are built expressly for underwater video work. A Intova tech told me his experience is the 30% power level works best in most situations.
The flexible, pose-able mounting stalks are 30 cm Intova Flex Arms, found at http://www.amazon.com/Intova-Flex-Arm/d ... d_sim_sg_9
The lamps are attached to the Flex Arms with these clamps: Intova Mini Torch Adapter, found at http://www.amazon.com/INTOVA-TAM-Intova ... d_sim_sg_8
The "zee clips" for attaching the base of the Flex Arms to your ROV you must fabricate yourself.
Hope this helps . . . good luck! Pilikia
Re: No Name ROV
I see there is now another similar option available. It is a little less bright, the beam angle is somewhat more narrow, it offers less separation distance between the lights and camera, and it doesn't offer adjusting side-to-side aiming. But it has the advantages of being more compact and less expensive. It is probably perfectly suitable.
http://www.amazon.com/Liquid-Image-4-7W ... d_sbs_sg_5
http://www.amazon.com/Liquid-Image-4-7W ... d_sbs_sg_5
- Attachments
-
- liquid-torch.JPG (9.02 KiB) Viewed 2779 times