Experimental ROV Design using Blue Robotics Components
Re: Experimental ROV Design using Blue Robotics Components
I like the idea of the BR cable penetrators, however they look like bicycle brake cable adjusters to me!
Re: Experimental ROV Design using Blue Robotics Components
@Bindo,
They are anodized aluminum. I would have preferred a high impact resistant ABS material in place of the aluminum which would have bonded better with the marine grade epoxy.
I have both the older cable penetrator configuration and the newer cable penetrator configuration.
The older configuration did not constrain the sealing O ring on the backside of the cable penetrator knurled head whereas the newer configuration has a groove in the back of the knurled head to constrain the sealing O ring. Also flats have been added on the sides of the knurled head.
Regards,
SSN626B/TCIII
Last edited by SSN626B on Sep 28th, 2015, 7:20 pm, edited 1 time in total.
Re: Experimental ROV Design using Blue Robotics Components
Hi All,
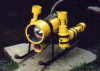
Today I potted each of the two horizontal Thrusters' power and control cables, that I had prepared previously for potting, with marine grade epoxy and I also used the excess epoxy to fill the back ends (inside the WTC) of the practice power and control cable penetrators.
Below are pictures of the power and control cables being held in my trusty vice and against my steel peening block while the marine grade epoxy cured:

Front View of Power & Control Cables Curing

Side View of Power & Control Cables Curing

Top View of Aux Power & Telemetry Cables Rear Potting

Side View of Aux Power & Telemetry Cables Rear Potting
While the horizontal Thruster cables were curing I prepared the vertical Thruster power and control cables for potting in their respective cable penetrators. I will pot the vertical Thruster power and control cables tomorrow along with the inside ends of the horizontal Thruster power and control cable penetrators, and finish preparing the other ends of the practice power and control cables for potting on Monday.
More to come.
Regards,
SSN626B/TCIII
Today I potted each of the two horizontal Thrusters' power and control cables, that I had prepared previously for potting, with marine grade epoxy and I also used the excess epoxy to fill the back ends (inside the WTC) of the practice power and control cable penetrators.
Below are pictures of the power and control cables being held in my trusty vice and against my steel peening block while the marine grade epoxy cured:
Front View of Power & Control Cables Curing
Side View of Power & Control Cables Curing
Top View of Aux Power & Telemetry Cables Rear Potting
Side View of Aux Power & Telemetry Cables Rear Potting
While the horizontal Thruster cables were curing I prepared the vertical Thruster power and control cables for potting in their respective cable penetrators. I will pot the vertical Thruster power and control cables tomorrow along with the inside ends of the horizontal Thruster power and control cable penetrators, and finish preparing the other ends of the practice power and control cables for potting on Monday.
More to come.
Regards,
SSN626B/TCIII
Re: Experimental ROV Design using Blue Robotics Components
Hi All,
I got the vertical Thruster power and control cables potted into their respective cable penetrators this morning. Additionally I used the remaining epoxy to pot the inside ends of the horizontal Thruster power and control cable penetrators.
On Monday I will pot the inside ends of the vertical Thruster power and control cable penetrators and pot the outside ends of the practice power and control cable penetrators.
More to come.
Regards,
SSN626B/TCIII
Re: Experimental ROV Design using Blue Robotics Components
Hi All,
Recently I have been giving some considerable thought to what it would take to move to a six Thruster vectored thrust configuration.
Once requirement would be to maintain the present four Thruster physical configuration while adding the two additional horizontal Thrusters. The reasoning behind this requirement is that there is no way to change the wire length of the present horizontal and vertical Thrusters without purchasing replacement Thrusters (expensive).
An additional requirement is that there be minimum shielding of the horizontal Thrusters in the six Thruster configuration. This will require relatively open side panels compared to the present four Thruster configuration.
The final requirement is how do I mount the WTC support platform in the six Thruster configuration if there is no vertical support in the side panels as there is with the four Thruster configuration?
The solution to moving to the six Thruster configuration will be to construct two new side panels where 75 percent of the panel area has been removed. The WTC support platform will be suspended from the top of the ROV chassis, in the same vertical position as it is on the four Thruster configuration, on vertical arms that will also serve as mounting points for the vertical Thrusters. The rear horizontal Thrusters will be mounted on cantilevered plates, attached to a horizontal cross bar, that are an exact duplicate of the forward horizontal Thruster mounting points.
Comments?
Regards,
SSN626B/TCIII
-
KR2_Diving

- Posts: 391
- Joined: Aug 30th, 2012, 11:43 am
- Location: Currently: NW Suburbs of Chicago. Originally: NE Wisconsin
Re: Experimental ROV Design using Blue Robotics Components
WOW! Very Impressive thread! I see you have been very busy!
I like the direction you are going! I too am playing with a 6 thruster design using the BR T100+BlueEsc and 4" WTC.
I am also struggling with the skeleton/frame of the ROV... It would appear you have a much better grasp of the concept... Below you can see my current concept, slightly modified to fit your design.
I am looking at only 1 - 4" WTC, which would contain everything but my lights. I am also toying with the idea of 2 - 2" lower tubes to contain my batteries...
Keep up the GREAT posts!
I like the direction you are going! I too am playing with a 6 thruster design using the BR T100+BlueEsc and 4" WTC.
I am also struggling with the skeleton/frame of the ROV... It would appear you have a much better grasp of the concept... Below you can see my current concept, slightly modified to fit your design.
- Layout Suggestions.JPG (41.04 KiB) Viewed 3726 times
Keep up the GREAT posts!
Re: Experimental ROV Design using Blue Robotics Components
Very cool.... this is just awesome I love the detailed build thread.
How deep are you building it for and what are you planning for a control system?
-Steve
How deep are you building it for and what are you planning for a control system?
-Steve
Re: Experimental ROV Design using Blue Robotics Components
Hi KR2_Diving,
Thanks for the kudos, much appreciated.
I have been told that I have too much shielding of the Thrusters in the side panels for an effective six Thruster configuration with vectored horizontal Thrusters as you have laid out above.
I thought that I would go with this present configuration and shake any bugs out in the hardware and control system and then move on to the six Thruster configuration which will require a little more complex Thruster control system and firmware.
As I have indicated in my thoughts on the six Thruster configuration I will try to salvage as much of the four Thruster configuration as possible when fabricating the six Thruster configuration.
Regards,
SSN626B/TCIII
Re: Experimental ROV Design using Blue Robotics Components
Hi Steve,
Thanks for the kudos, much appreciated.
Actually this ROV build thread are exerts from my ROV Project Build thread on DIY Drones ArduBoat User Group.
As not many of the members here on homebuiltrovs know about my ROV Project Build thread I thought it might be interesting to share my ROV design and build concepts here especially since I am employing Blue Robotics components and hardware in my build.
I plan to control the four Thruster configuration with Nick's (njs552) two board ROV control solution and then move up to a Beagle Bone Black with a MINI Cape to employ a more sophisticated control system for the vectored six Thruster configuration.
Since I live in Southern Florida where the costal waters are not too deep, I plan to run at a maximum depth of around 100 feet, though the Blue Robotics WTCs are rated for 300 feet.
I do plan to run a vacuum (leak) test on the WTCs once I get them assembled
Regards,
SSN626B/TCIII
Re: Experimental ROV Design using Blue Robotics Components
Cool I'll have to check that out... I appreciate you sharing it here too though, it's always good to see what others are building.
-Steve
-Steve