Rov Reboot (3D Printed Rov)
Re: Rov Reboot (3d Printed)
Wow!!!!Really nice construction 
Re: Rov Reboot (3d Printed)
Yeah the end result turned out really nice, good job!
Re: Rov Reboot (3d Printed)
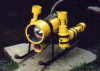
- Camera Tube 18.jpg (433.38 KiB) Viewed 60730 times
-Steve
Re: Rov Reboot (3d Printed)
there is deffo oring compression there! possibly a little too much?
how hard are the orings you've selected?
how hard are the orings you've selected?
Re: Rov Reboot (3d Printed)
Yeah it probably is too much, I can't even get the end cap off now.  They are silicone O-rings and listed as "Durometer is A70". At this point as long as it's sealed I don't care. I'll cut the grooves deeper on the next one.
-Steve
-Steve
Re: Rov Reboot (3d Printed)
- Printer-056.jpg (137.45 KiB) Viewed 60426 times
- Printer-057.jpg (415.83 KiB) Viewed 60426 times
Now it's on to the painting process.....
-Steve
Re: Rov Reboot (3d Printed)
- Printer-056.jpg (58.64 KiB) Viewed 58956 times
- Printer-058.jpg (838.63 KiB) Viewed 58956 times
- Printer-057.jpg (817.73 KiB) Viewed 58956 times
- Printer-060.jpg (693.79 KiB) Viewed 58956 times
- Printer-059.jpg (679.97 KiB) Viewed 58956 times
- Printer-061.jpg (739.55 KiB) Viewed 58956 times
https://www.youtube.com/watch?v=yOj77rxLPmE
Here is some video of the first control tests... it's not very exciting but it looks like it going to work out. It's not balanced correctly yet I still have to add the camera pod and mini manipulator I designed for it so it's pushing the nose up right now. It actually might be a little to fast for just on/off control though so I might have to add a speed control up top to limit the power to the thruster. I'll figure that much out when I get to it.
Hopefully it's not another couple years before the next update.
-Steve
Re: Rov Reboot (3d Printed)
It looks realy nice and very fast indeed.
Re: Rov Reboot (3d Printed)
- Printer-062.jpg (670.27 KiB) Viewed 58927 times
- Printer-063.jpg (164.22 KiB) Viewed 58927 times
-Steve
Re: Rov Reboot (3d Printed)
- Printer-064.jpg (911.14 KiB) Viewed 58924 times
- Printer-065.jpg (1.44 MiB) Viewed 58924 times
Next I have to machine out some recesses on the one end cap and drill some holes for the through connectors for the 5 wires. After that I will have to re-test in back in the chamber before installing the actual camera. Overall things are going well and it feels great to be making progress on this project again.
-Steve