Hi all,
This is my first ROV and thought I'd share the build process, I'm new to ROV building but have always been a tinkerer.
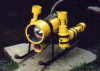
I started by producing a CAD drawing on my computer then I order the parts to build the hull.
First ROV build
First ROV build
- Attachments
-
- image.jpg (284 KiB) Viewed 6119 times
Re: First ROV build
The sides are from a chopping board, as they are cheap and easy to machine, I have also made the motor mounts from the same material.
The two sides are joined using m6 stainless steel threaded bar with stainless nuts and washers.
I bought the dome which is 100mm diameter and made from clear Perspex.
I have now ordered the material to make the camera housing, this is made out of aluminium, which I will powder coat white once complete.
I should have the camera housing ready in a week or two.
Dave
Re: First ROV build
Looking good so far, what are you planning on using for thrusters?
-Steve
-Steve
Re: First ROV build
Hi Steve.
I have three 500gph bilge pumps converted to run on three blade props.
Two for forward & reverse and these will also be used for turning.
Then the other one for up and down.
I've put all the frame together and I'm waiting on my grub screws to hold the motors in.
Thanks Dave
I have three 500gph bilge pumps converted to run on three blade props.
Two for forward & reverse and these will also be used for turning.
Then the other one for up and down.
I've put all the frame together and I'm waiting on my grub screws to hold the motors in.
Thanks Dave
Re: First ROV build
This is the camera housing, anybody used something similar?? I don't know wether to bring the cables in through the back or to add an aluminium tunnel in the top.
- Attachments
-
- image.jpg (203.64 KiB) Viewed 5882 times
-
Oldsirhippy

- Posts: 86
- Joined: Oct 1st, 2013, 7:18 am
Re: First ROV build
Nice design.
How do you keep the rings into which the bolts screw in, onto the tube? and how did you make the cylinder water pressure proof?
How do you keep the rings into which the bolts screw in, onto the tube? and how did you make the cylinder water pressure proof?
Re: First ROV build
Oldsirhippy wrote:Nice design.
How do you keep the rings into which the bolts screw in, onto the tube? and how did you make the cylinder water pressure proof?
Hi, I had the two end flanges welded on, then I had the faces ground flat, the dome end will be sealed with silicon and bolted together perminatley whilst the other end will be removable.
I'm not sure how much pressure the housing will be, but the two flanges are 6mm thick and the tube is 3mm thick and are fully welded to each other, I only need to go about 15meters deep and I'm pretty sure it should be ok.
Dave
Re: First ROV build
This is a close up of the flange welded to the tube and ground flat
- Attachments
-
- image.jpg (145.62 KiB) Viewed 5851 times
-
UnknownROV
- Posts: 14
- Joined: Oct 25th, 2014, 12:10 pm
Re: First ROV build
Looks nice! I'm thinking same kind of design for the camera housing.
Re: First ROV build
Looks nice!
For hull penetrations, going out the back plate is probably going to be logistically easier. A curved section of identical material would be slightly stronger, but harder to seal against. You can make your own pass throughs, or buy one of the various waterproof connector sets. I'm using a set of Lemo waterproof connectors for mine. I don't have the endcaps to install them into yet though heh.
For hull penetrations, going out the back plate is probably going to be logistically easier. A curved section of identical material would be slightly stronger, but harder to seal against. You can make your own pass throughs, or buy one of the various waterproof connector sets. I'm using a set of Lemo waterproof connectors for mine. I don't have the endcaps to install them into yet though heh.