Hi everyone!
I’m quite new in the hobby of ROVs and ‘Triton’ is my first try.
As a start, I would like to thank all members of the forum. Without their direct (or indirect) help I wouldn’t be able to complete Triton.
My first experience with ROVs came with an Rov-in-a-box, the kit of which I bought and made my first steps.
Based on this design, I decided to built one of my own. Since I’m a marine biologist, I see ROVs not only as a nice hobby, but also as tools for my work.
So, the main goal of Triton is to dive at least to 30m (50m would be ideal) instead of me. Diving is great, but has limitations. It cannot actually ‘replace’ me, but it can save me time and money and give me much more time underwater than scuba-diving.
Some things about the ‘hardware’:
- Copper-pipe Ø22mm frame
- PVC-pipe Ø75mm buoy
- Three L1600gph Johnson Heavy-duty bilge pumps (12V/24V)
- Two 8x4 APC airplane model props for Left/Right motors
- One 9x5 APC airplane model prop for Lift
- 12V Motorcycle Battery (14Ah) mounted on the frame
- 6 DPDT-relay control system for motor control
- Two 650TVL HD 1/3'' SHARP CCD Starlight 0.001Lux Color Board Camera with a 2.1mm lens
- Three LED headlights
- 100m tether consisting of two 8x0.22mm2 (24 AWG) cables, one for cameras/lights and one for relay control.
- Overall dimensions: 65cm x 50cm x 35cm
- Weight: Approx. 15kg
The design is quite robust, but I preferred to pot everything in order to be as waterproof as possible. It is not the best practice I know. If something goes wrong it is difficult to replace, but during field work I have to be as ‘damage-proof’ as possible.
The battery is potted in wax along with the fuses for the motors, in order to be easily accessible for charging or replacement of the fuses. Everything else (cameras, lights, relays) is permanently potted in ‘liquid glass’ a transparent epoxy material. All boxes and the camera/lights bases are made from plexi-glass. The control box is still quite primitive, but as I had it almost ready from the first ROV I decided to make some adjustments and not build a new one.
You can see details in the posted images.
The first test dive was great. I will also post two small videos in the ‘Mission Footage’ section of the forum.
Triton Project
Triton Project
- Attachments
-
- At last in the water!
- Triton_first_dive.jpg (153.73 KiB) Viewed 3512 times
-
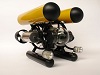
- Triton assembled and ready to dive!
- Triton.jpg (116.24 KiB) Viewed 3512 times
-
- Potted LED light test...
- ROV_Headlight.jpg (63.72 KiB) Viewed 3512 times
-
- Potted DPDT relays
- Potted_relays.jpg (87.13 KiB) Viewed 3512 times
-
- Lift motor, collet adapter and prop
- Lift_motor.jpg (59.93 KiB) Viewed 3512 times
-
- Front camera and lights
- Front_camera.jpg (81.34 KiB) Viewed 3512 times
-
- The camera and light for seabed view
- Down_camera.jpg (81.25 KiB) Viewed 3512 times
-
- The control box
- Control_box.jpg (93.12 KiB) Viewed 3512 times
-
KR2_Diving

- Posts: 391
- Joined: Aug 30th, 2012, 11:43 am
- Location: Currently: NW Suburbs of Chicago. Originally: NE Wisconsin
Re: Triton Project
Great build! Looks pretty "bomb proof!" or at least field work proof!
Well designed and laid out!
how do you find the plane props? Do they give you enough forward and reverse thrust?
Well designed and laid out!
how do you find the plane props? Do they give you enough forward and reverse thrust?
Re: Triton Project
Well I'm not sure if it's "bomb proof" but I surely hope it will make it through some "tough" dives.
I'm planning to push it a little to see its limits.
The props are fine. The bollard test I made gave about 1.6kg of force for each motor which is quite adequate to manoeuvre it.
I made a lot of tests during the summer and you can see my results in the file (I can't attach excel and word files in the forum, is this normal?).
I had good results with the 8x4 props when chopped by 1cm on each side.
I haven't chopped the mounted ones yet, since the differences were not so high.
I'm planning to test 2 things in the near future:
1. Make some speed measurements to see how fast I can move underwater
2. Try some boat props to compare with the plane props.
- Attachments
-
- Bollard test data
- Bollard_Test.jpg (272.23 KiB) Viewed 3492 times
-
KR2_Diving
- Posts: 391
- Joined: Aug 30th, 2012, 11:43 am
- Location: Currently: NW Suburbs of Chicago. Originally: NE Wisconsin
Re: Triton Project
Great info! Lots of tests!
Any issues with the prop adapters coming loose when spinning "backwards?" Have you secured these using any sort of glue or thread lock?
Ryan "KR2_Diving"
Any issues with the prop adapters coming loose when spinning "backwards?" Have you secured these using any sort of glue or thread lock?
Ryan "KR2_Diving"
Re: Triton Project
Yeap! They are getting loose sometimes on reverse, even with 2 nuts on the adapter. Haven't yet fixed the problem permanently, but it seems that if you tighten the 2 nuts and the front part of the adapter it's ok. I'm planning to try some "secure" nuts (these with the plastic coating inside.
Alex (Triton)
Alex (Triton)
-
bikerbones1968
- Posts: 374
- Joined: May 10th, 2012, 5:21 pm
- Location: Annapolis Valley Nova Scotia
- Contact:
Re: Triton Project
Great looking project. To prevent my props from getting loose I just used epoxy on the prop shaft slid my prop on and tightened it down with the locking nut. It seems pretty robust and secure.
Re: Triton Project
Thanks for the tip!
Is it easy to un-screw though? I disassemble the props after each dive for maintenance.
Is it easy to un-screw though? I disassemble the props after each dive for maintenance.
-
bikerbones1968
- Posts: 374
- Joined: May 10th, 2012, 5:21 pm
- Location: Annapolis Valley Nova Scotia
- Contact:
Re: Triton Project
I would imagine it would be very hard to disassemble them using epoxy. I will not need to phyiscaly remove my props. I am using brushless motors that will exposed to the water, flush with fresh water, blow dry with compressed air and a quick shot of non conductive lubricant and put it on the shelf.
Re: Triton Project
I had thought it would be difiicult. I disassemble the colet adapter and the props every after dive, because at my first ROV the adapter and the shaft became 'one thing' due to corosion (I used to just rinse them with tap water after every dive). When my motors broke, I had to throw away the adapters too and managed to save the props after I cut the shaft and the adapter. Now, I take the adapter off the shaft, disassemble everything, rinse them with tap water, grease them with lithium grease and reassemble everything until the next dive.
I'm now sure that my next design will be equipped with brushless motors. But until then, I hope I'll make some dives.
I'm now sure that my next design will be equipped with brushless motors. But until then, I hope I'll make some dives.