Stingray ROV

What are you working on .... Show off your Rov's Projects here.
Post Reply
JonnoLad
Posts: 19
Joined: Jun 18th, 2022, 12:49 pm

Stingray ROV

Post by JonnoLad »

Hi All,

I have only really posted about my thruster design so far, so I think I will start a thread about my ROV itself! The end is in sight now, as I have finished all of the thrusters, pressure tested the whole thing in my nearest lake (living in the lake district is handy) and then installed the electronics in the dry tube.
20221009_153936 compressed.JPG
20221009_153936 compressed.JPG (606.27 KiB) Viewed 15049 times
I pressure tested it to just over 30m, which is more than it will see in service since it only has a 25m tether. I may get a longer tether later on if 25m is too short. Unfortunately a small amount of water (only about a teaspoon) leaked into the dry tube, but this was just caused by some epoxy I spilled on one of the sealing faces.

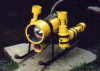
The frame is just made of PVC pipe, so nothing particularly interesting there. All of the buoyancy comes from the dry tube. The thrusters are mounted using 3D-printed clamps, which can be repositioned as required. It has two cheap off-roading lights from e-bay for illumination, which I waterproofed with polyurethane. There is a 90mm diameter (10mm thick) acrylic window bonded to the front of the dry tube. This is flat, not a dome mainly because it was easier this way. It cost about £1 to get it custom cut, which was much less than I expected. I put some metal mesh on the bottom to give me somewhere to put ballast, and also to stop it from sucking in as much debris from the bottom.

The camera is a wide angle raspberry pi camera. I have it pointing slightly downwards to give better visibility directly in front of the ROV (no pan-tilt here unfortunately).

I have tested the ROV in my work's test pool, which went surprisingly well! The first time, one of the thrusters was not running at full speed, but this was just because I forgot to glue the motor shaft to the magnet wheel :lol:. The second time everything performed well, and my colleagues had a bit of a competition to pick up a coffee mug off the bottom of the pool! Unfortunately I can't show any pictures or videos of that testing here, because I shouldn't really show images of my workplace without permission.

I have left space and cables for attachments/tools on the T-piece centre front. I have an electromagnet, and might print some other tools such as a grabber. Hopefully I find something other than beer cans to pick up!

The ROV tether plugs into a box topside. This box contains the remains of a router, as well as a battery meter, fuses, switches and a power supply for charging my laptop. The ROV itself is controlled completely from the laptop. The use of Wi-Fi is so that the laptop doesn't have to be directly attached to the tether. This also means that multiple people can connect to the ROV at once and view the live camera feed using their phones.
DSC_0524_3.jpg
DSC_0524_3.jpg (307.25 KiB) Viewed 15049 times
At the time of writing this post, I am waiting for the ROV's batteries to arrive (so far I have been running it off mains through a step down power supply). As soon as they arrive, I will be able to take it to the lake and do the first open-water test dives. I will try to post some pictures and videos as soon as that happens, hopefully within a week!
JonnoLad
Posts: 19
Joined: Jun 18th, 2022, 12:49 pm

Re: Stingray ROV

Post by JonnoLad »

Some additional info, for those who are interested:

Here is a flow chart of all the systems in the ROV. The raspberry pi runs the "RPi Cam web interface" software. This hosts a webpage with the camera stream on it. It also allows for Pictures to be recorded. The program for controlling the ROV hardware is completely separate, and was custom made by me. This program runs on the laptop, and sends commands to the raspberry pi's built in GPIO server over ethernet.
Stingray System Flow Chart no name.png
Stingray System Flow Chart no name.png (78.17 KiB) Viewed 15043 times

Here is the Power control PCB that I designed. I am using relays for control, with 3 reversible thruster channels, and 3 non-reversible AUX channels for lights and other accessories. The relays have 5VDC coils, powered by the 5V power supply. The raspberry pi is also powered by the 5V supply.
DSC_0654.JPG
DSC_0654.JPG (589.83 KiB) Viewed 15043 times
JonnoLad
Posts: 19
Joined: Jun 18th, 2022, 12:49 pm

Re: Stingray ROV

Post by JonnoLad »

Update!

I did my first successful open water dive today, no issues!

I recorded a short video with a screen capture program. It's not the best quality because of the compression but you should get the idea:
https://youtu.be/St3KkrMtBiI

Ignore the date and time on the camera, it's wrong. The raspberry pi is just counting time from the last time it was connected to the internet!
20221025_153220 small.JPG
20221025_153220 small.JPG (335.23 KiB) Viewed 15042 times
20221025_145110 small.JPG
20221025_145110 small.JPG (416.54 KiB) Viewed 15042 times

I also captured some photos with the ROV. These were taken and stored on the Raspberry pi and retrieved later. I'm really happy with the quality of them!
On the Pier
On the Pier
im_0022_20220829_165753.jpg (571.79 KiB) Viewed 15042 times
Bricks!
Bricks!
im_0016_20220829_164208.jpg (445.71 KiB) Viewed 15042 times
Pier supports
Pier supports
im_0006_20220829_161658.jpg (329 KiB) Viewed 15042 times
User avatar
sthone
Posts: 589
Joined: Nov 8th, 2010, 9:25 pm
Location: Connecticut
Contact:

Re: Stingray ROV

Post by sthone »

Great Work... Very cool project it looks like the first test went well. I really like the wifi setup aspect of it. Looking forward to seeing some future dives.

-Steve :sting:
JonnoLad
Posts: 19
Joined: Jun 18th, 2022, 12:49 pm

Re: Stingray ROV

Post by JonnoLad »

Thanks! I'm really pleased with it, especially considering it's my first ROV (no doubt there will be more in the future!). I've done a quick test in the dark with it to test out the lighting, and it works well! I've had a few tip-offs of where there might be some interesting stuff to look at, including a flooded quarry local to me, which has mining equipment and the odd car in it. I'll gradually do more challenging dives to build up my experience piloting it, and also find any issues with the ROV.

I've also started designing various tools to go on the front, which I intend to be quick-swappable by means of a 3D printed adapter.

Some backscatter from the lights due to the dirt in the water, but they provide good illumination! The water at this pier seemed worse quality than at the location of my first dive. There was lots of loose weed, but luckily the prop guards prevented any tangles!
im_0000_20220829_171759.jpg
im_0000_20220829_171759.jpg (302.64 KiB) Viewed 15024 times
20221028_181811.JPG
20221028_181811.JPG (203.64 KiB) Viewed 15024 times
User avatar
sthone
Posts: 589
Joined: Nov 8th, 2010, 9:25 pm
Location: Connecticut
Contact:

Re: Stingray ROV

Post by sthone »

No way around the scattering or crap in the water (just a fact of ROV life) but I'm very impressed with the quality of the Pi camera. I always was curious on how well they worked because it seemed like anytime I saw BlueROV footage it was always shown with an add on Gopro and not the main camera. Might have to look more into the Pi route one of these days.

-Steve :sting:
JonnoLad
Posts: 19
Joined: Jun 18th, 2022, 12:49 pm

Re: Stingray ROV

Post by JonnoLad »

Yes, I was quite happy with the camera quality. The quality of the live feed is not quite as good as the still images, simply because the processing power of the pi is limited and therefore turning the quality up results in an awful latency. The live feed is still 720p though so not that bad, especially on a small laptop screen.

The camera I used is not the official raspberry pi one because I found that the FOV of the official one (54 degrees I think) was not wide enough to be able to navigate easily underwater. I used a Waveshare 160 degree fisheye camera, which is the same size as the official pi camera, but offers a very good FOV. Even better, it was plug and play just like the official raspberry pi version.

I got the camera from The Pi Hut in the UK, but here is the link to it on the official Waveshare site if anyone is interested: https://www.waveshare.com/rpi-camera-g.htm
Post Reply