You're off to a good start!!
All i see in your post are image placeholders, i had to right-click, open in imgur to see each one. Dunno...?
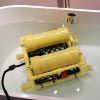
I could use some explanation as to what the IC's on the breadboard do.
The floats are fine, just add more weight until it is just slightly positively buoyant. Then when you get near the bottom, you'll have to run your vertical thrusters to keep you there. Water jetting upwards will disturb much less silt than water jetting downwards.
I see your floats are bolted through the frame...make sure there are holes in the top and bottom of the frame, so it can flood during immersion, so the buoyancy doesn't change slowly as water seeps into the hollow frame.
You might put the vertical thrusters on a PWM controller, so you could set a certain level of thrust and leave it there.
https://www.ebay.com/itm/10A-Pulse-Widt ... OSwkl5XflA~
Remember to keep your lights as far from your camera as possible, to reduce backscatter off particulate matter floating in the water. Otherwise it's like trying to look through a snowstorm.
For cheap but hella bright LED lights, i bought these and coated them with epoxy resin fiberglass (two part epoxy), local craft store, 5-minute cure. Can be thinned with denatured alcohol. No fancy case needed. Can be dimmed with PWM controller. Controller can be operated by a servo on the ROV.
https://www.amazon.com/Bright-Trailer-M ... th=1&psc=1
Here's a 3-axis joystick with button you might like...
https://www.amazon.com/Plastic-Joystick ... AC8K785XZW
You say the lake is frozen...how frozen? Could you throw together an icehouse and drag it out, chainsaw a hole in the ice, sit next to a propane heater and have fun exploring in the winter? I'd do that here but the water 'clarity' is like looking through wet concrete...lol.