My new BLOG

Anything to do with Propulsion.
martinw
Posts: 91
Joined: Sep 20th, 2011, 11:02 am
Location: Aberdeenshire

My new BLOG

Post by martinw »

I'm a bit wary about posting this as my first post as it's potentially moving the forum member away from the forum, so if I'm doing something wrong I apologise, but I thought it might be of interest to some forum members anyway.

http://martin-wareham.blogspot.com/

If there are comments, maybe post them on here, rather than on the BLOG, as a way of keeping information about it on here :?:
martinw
Posts: 91
Joined: Sep 20th, 2011, 11:02 am
Location: Aberdeenshire

Re: My new BLOG

Post by martinw »

I've just posted a new update to my blog, I'm averaging about 1 update every six months at the moment :oops: :lol:

http://martin-wareham.blogspot.co.uk/

Slow but sure ;)

Martin
martinw
Posts: 91
Joined: Sep 20th, 2011, 11:02 am
Location: Aberdeenshire

Re: My new BLOG

Post by martinw »

New post; motor shaft extension.

http://martin-wareham.blogspot.co.uk/

Martin
martinw
Posts: 91
Joined: Sep 20th, 2011, 11:02 am
Location: Aberdeenshire

Re: My new BLOG

Post by martinw »

It's starting to look a bit like a real ROV thruster now ..... sort of :)
Thruster with nozzle 1.jpg
Thruster with nozzle 1.jpg (80.49 KiB) Viewed 7653 times
24VDC, 80 watt brushless DC motor and controller built into the unit. My intention is to oil fill on my ROV and pressure compensate so there are no problems with depth. So far about 750g of thrust in quite a small tank so I would probably expect about 1kg in a real situation.
Thruster with nozzle 2.jpg
Thruster with nozzle 2.jpg (43.57 KiB) Viewed 7653 times
My intention is to make a vectored ROV with two vertical thrusters so I'm looking at ways of making the parts for all the thrusters as economically as possible (I already have the motors), aswell as the main control PCB and control box, again oil filled and also the frame/buoyancy.

Still lots to do but I thnk the hardest part on an ROV is the thruster design, we'll see ........ 8-)

Martin
martinw
Posts: 91
Joined: Sep 20th, 2011, 11:02 am
Location: Aberdeenshire

Re: My new BLOG

Post by martinw »

1kg of thrust!

http://martin-wareham.blogspot.co.uk/

With a vectored horizontal arrangement (i.e. four thrusters in a diamond shape) and a bit better water flow in a larger mass of water we should be talking about 4kgs of thrust at all four points, fwd, aft, port, stbd, I would hope 8-)

Martin
martinw
Posts: 91
Joined: Sep 20th, 2011, 11:02 am
Location: Aberdeenshire

Re: My new BLOG

Post by martinw »

Final post of 2012, slow but sure progress, I am a tortoise :lol:

http://martin-wareham.blogspot.co.uk/

Martin
martinw
Posts: 91
Joined: Sep 20th, 2011, 11:02 am
Location: Aberdeenshire

Re: My new BLOG

Post by martinw »

It's looking even more like a "proper" ROV thruster now with a Kort Nozzle and a bit more thrust into the bargain :D
New Kort Nozzle Front.jpg
New Kort Nozzle Front.jpg (52.25 KiB) Viewed 7258 times
New Kort Nozzle Rear.jpg
New Kort Nozzle Rear.jpg (63.26 KiB) Viewed 7258 times
Martin
User avatar
KR2_Diving
Posts: 391
Joined: Aug 30th, 2012, 11:43 am
Location: Currently: NW Suburbs of Chicago. Originally: NE Wisconsin

Re: My new BLOG

Post by KR2_Diving »

Quick question!
It looks as though your power feed for the motor is contained within a hose connected to the back of the thruster. Is the "atmosphere" inside the thruster housing the same as the one inside the hose?
I'm lacking the ability to think of the right words this morning... need more coffee probably...
martinw
Posts: 91
Joined: Sep 20th, 2011, 11:02 am
Location: Aberdeenshire

Re: My new BLOG

Post by martinw »

Hi,

Yes the 'atmosphere' is the same (fluid).

My intention is to take all the hoses from the thrusters back to a central point (junction box), connect then together, then take in my tether/umbilical from the surface to the same junction box, probably through a gland.
ROV Propulsion.JPG
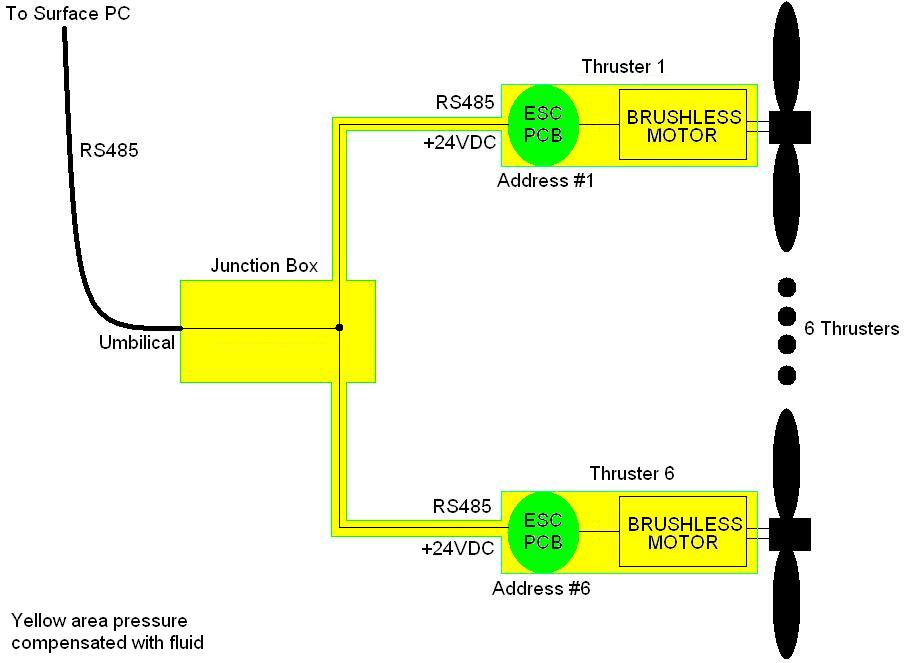
ROV Propulsion.JPG (51.5 KiB) Viewed 7248 times
The intention is then to make the yellow (in the drawing ;)) fluid pressure equal the water pressure using a compensator (probably an oil filled balloon of sorts).

This means the differential pressure on the motor shaft seal, motor housing, hose and junction box remain the same (and low) no matter what the depth.

That's the plan as it stands today anyway :)

Martin
martinw
Posts: 91
Joined: Sep 20th, 2011, 11:02 am
Location: Aberdeenshire

Re: My new BLOG

Post by martinw »

This isn't my idea by the way, it's been used on ROVs for a long time (although they don't use balloons ;))
ROV Propulsion Compensator.JPG
ROV Propulsion Compensator.JPG (62.06 KiB) Viewed 7247 times
Basically the balloon (being made of rubber) transfers the pressure from the water, to the fluid, meaning all the green lines in the picture (boxes, tubes etc.) can be made from relatively thin material and the shaft seals on the thrusters aren't being constricted by external pressure and drawing more current/wearing out faster.

The down side is anything in the junction box or thruster etc., i.e. the ESC must be designed to be able to withstand the pressure, which it is ;)

I hope this makes things a bit clearer.

Martin
Post Reply