Nice - I really like the acrylic panel. Way simpler than some of the stuff I've tried in the past. Is that based off of the Nemo 200 housing design? I'm working on a housing like yours at the moment.
thegadgetguy wrote:Nice - I really like the acrylic panel. Way simpler than some of the stuff I've tried in the past. Is that based off of the Nemo 200 housing design? I'm working on a housing like yours at the moment.
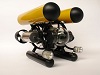
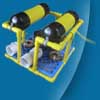
Yes it is based off of the Nemo200. I found the idea via YouTube looking at ROV's. I really liked the concept and needed specifics on the housing design. After a few web searches about the housing I manage to find a way contact Robb Moffet. He designed and hand built every Nemo200 enclosure ever sold. He rated the housing to 150 feet but told me that they dove over 200 feet multiple times and never had issues.
When I reached him he was a extreme pleasure to speak to, has a great sense of humour, was very helpful and just an all around outstanding gentleman. I got one of his Instructional DVD's that he made mailed to me. He now lives in a very small apartment, retired and no longer builds them.
Here comes the questions LOL, How do you plan on controlling it? this is the one area that makes me bang my head against the wall, not so much wireing, but programming an arduino to recieve commands by either lap top or another arduino or something similar. I guess one could just use wires and relays but then you would wind up with one heck of a tether. Im still a ways off on that one, but I would like to have it figured out prior to building a housing. Sitting here playing with the video camera and 7" monitor now. Dang cat keeps pulling the wires out of the project board lol. Maybe with a little luck ill get the monitor mounted in its case today, atleast then I can say I did something.....
Hi David, I am using a JR XP6102 Transmitter and receiver. It's a older style 72 MHz computer transmitter and compatible R700 DSC Receiver. I bypass the radio frequency transmission with the use of a DSC (Direct Servo Control) jack equipped on these radio controllers. It sends the raw PPM (Pulse Position Modulation) data over a single twisted pair. I have tested the data transmission over 1000 feet on a single pair successfully.
I have setup the controls to do the following:
The gear up and down switch I will have a "servo relay" to operate the on off function of my twin 100W LED lights.
For the left stick I used the throttle (up and down) for my camera tilt function (no pan). Stick to the left dives and right submerges.
The right stick is set up for both left and right thrusters. Stick forward (up) both thrusters forward, stick reverse (down) both thrusters reverse. Left movement is right thruster forward left thruster reverse. Right movement is left thruster forward right thruster reverse. I also have the ability to move the stick diagonally which controls each thruster individually in either forward or reverse.
Here is a shot of one of the four 750KV brushless outrunners going on the ROV. I am using 52mm plastic boat props I got off eBay. I used compression style prop adapters that came with the motors , a filed down brass thumb nut and 4mm airplane prop adapters also purchased on eBay. I had to drill and tap the airplane prop adapters to thread on the compression style adapter. All of the parts were tighten up thoroughly after I applied 5 minute epoxy to each piece. I doubt I could take them apart now if I had to. I built 6 complete thrusters and my ROV will only use 4. In the event of a catastrophic failure it will be simple plug and play to throw on a new one.
Somebody needs to come over here and slap me so I stop trying to find the hardest way of doing things. Nice looking thruster Bones, have you done any testing to see what they put out?? How about a video of them kicking up some waves??
It still kinda freaks me out though, running an electrical motor exposed underwater, I work in a water plant and it only takes a little bit of water to distroy our motors. But then agin they are a totally different beast.....